Windows Installation
Prerequisites
Enterprise deployments of the AND Browser Plugin requires an Organization UUID (org uuid) for configuration, preferences, and real-time telemetry to be associated with your company. Please contact Hoplite Support to request your Organization UUID.
Note
Before proceeding, please contact Hoplite Support to request a download link for the desired configuration profile that is required to manage the AND Browser Plugin. To deploy the custom configuration profile that is setup for the management and customization of the AND Browser Plugin, it is expected that the organization utilizes a Mobile Device Management plan that supports the deployment of managed configuration profiles and applications to the intended devices.
Note
Many of the steps discussed within this document require Local and Domain Admin permissions for installation of software components, please ensure you have adequate permissions, and a clear deployment method in mind. Should you have any questions, please contact Hoplite support for guidance.
Group Policy Object-based Browser & Plugin Management Requirements
Google Chrome
If your organization intends to manage Google Chrome browser installation, policies and extensions, please read, and install the Google Chrome Browser Policy GPO templates shown here.
Microsoft Edge
If your organization intends to manage Microsoft Edge browser installation, policies and extensions, please review documentation shown here.
Firefox
If your organization intends to manage Firefox browser installation, policies and extensions, please read, the Firefox Browser Policy GPO documentation here then download and install the templates shown here.
Manual Installation
Note
Any of the following manual installation processes should be repeated for all user accounts on a given machine. If you are using a GPO-based installation method for the AND Browser Plugins, please skip to the ‘AND Browser Plugin (GPO) Installation’ section.
Chrome
To manually install the Google Chrome version of the AND Browser Plugin, please perform the following steps:
Open Google Chrome and visit the Google Chrome Web Store and open the AND Browser Plugin page here.
Next, click the ‘Add to Chrome’ button in the upper right corner to begin installing the plugin. Then click ‘Add Extension’ button.
Edge
To manually install the Microsoft Edge version of the AND Browser Plugin, please perform the following steps:
Open Microsoft Edge and visit the Edge Add-Ons Marketplace here.
Next, click the ‘Get’ button in the upper right corner, and follow the prompts to complete the installation.
Firefox
To manually install the Firefox version of the AND Browser Plugin, please perform the following steps:
Open Firefox and visit the Firefox Add-Ons Marketplace here.
Next, click the ‘Add to Firefox’ button near the middle of the screen. Then click the ‘Add’ button to complete the installation.
Brave
Since the Brave Browser uses native Chrome extensions, manually install the Google Chrome version of the AND Browser Plugin, please perform the following steps:
Open Brave and visit the Google Chrome Web Store and open the AND Browser Plugin page here.
Next, click the ‘Add to Chrome’ button in the upper right corner to begin installing the plugin. Then click ‘Add Extension’ button.
Manual Installation & Configuration of Native Messaging Host Applications
If you intend to manually install a Native Messaging Host Application, please follow the steps below for each browser you intend to use. If you are using a GPO-based installation method, please skip this section. Once installed, the AND Browser Plugins and Native Messaging Host Applications work asynchronously in the background and require no user or administrator interactions.
Download the MSI installer package to the destination machine.
Please close all open web browser windows, then double click on the MSI installer package icon to begin the installation.
You will be prompted to enter Administrator credentials, please enter the Administrator password and click ‘OK’.
Please follow the MSI installer package prompts and accept the default values to complete the installation.
Once the MSI install process is complete, open a Windows command prompt with Administrator privileges by right-clicking ‘cmd.exe’ and clicking ‘Run as Administrator’.
Next, provide the Administrator password and click ‘OK’.
Within the Administrator command prompt, navigate to the installation directory of the Native Messaging Host Application installed above:
cd C:\Program Files\Hoplite\Plugins\Chrome
cd C:\Program Files\Hoplite\Plugins\Firefox
cd C:\Program Files\Hoplite\Plugins\Edge
Next, run the appropriate Native Messaging Host Application as follows:
chrome-nm-host.exe –install <UUID>
firefox-nm-host.exe –install <UUID>
edge-nm-host.exe –install <UUID>
Note
<UUID> is your Organization UUID issued by Hoplite Support. Example using the Chrome Native Messaging Host Application is shown below.
Warning
Each browser requires a corresponding Native Messaging Host Application to fully enable the respective AND Browser Plugins. This process will need to be repeated for each browser you intend to use.
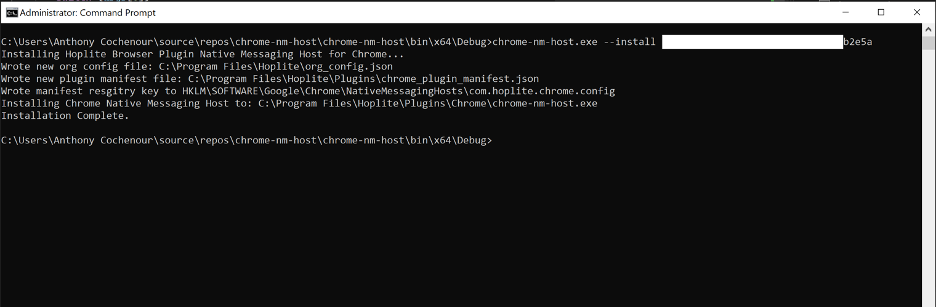
Manual Installation of a Native Messaging Host Application
GPO-Based Installation
Using Group Policy Objects (GPO) is an effective way to deploy specific browsers, policies, and extensions to hundreds or thousands of machines quickly. The following information should be incorporated into browser GPO templates referenced above to install/update browsers, and to automatically install AND Browser Plugins. We strongly recommend performing pre-deployment testing to ensure GPO-based installation methods work as intended before deploying to production systems.
Chrome
Using the ‘Configure list of force installed apps and extensions’ template for Google Chrome in the Group Policy editor, add the following value to force install the And Browser Plugin for Chrome: khibgfahflhdgondeeceflfhaejnpadf;https://clients2.google.com/service/update2/crx
Note
Due to browser requirements, the AND Browser Plugins must be deployed on a per-user basis. Please be sure to associate all users in your organization who need the plugin with this GPO action.
Firefox
Follow the instructions here to create a Firefox browser policy for each user. Use the line below in Step 6 to force install the Firefox version of the AND Browser Plugin: https://addons.mozilla.org/firefox/downloads/file/3865957/hoplite_browser_security-1.1.0.1-an+fx.xpi
Note
Due to browser requirements, the AND Browser Plugins must be deployed on a per-user basis. Please be sure to associate all users in your organization who need the plugin with this GPO action.
Microsoft Edge
Use the ExtensionInstallForcelist policy to control which extensions are blocked or allowed. Use the following steps as a guide to force-install an extension.
In the Group Policy Editor, go to Administrative Templates> Microsoft Edge > Extensions > and then select Control which extensions are installed silently.
Select Enabled.
Click Show.
Enter the app extension ID (see below) to force-install.
The extension will be installed silently with no need for user interaction. The user also won’t be able to uninstall or disable the extension. This setting will overwrite over any blocklist policy that’s enabled.
ggkofnpdecgohcjdpmoifmlohpgbleao;https://edge.microsoft.com/extensionwebstorebase/v1/crx
Note
Due to browser requirements, the AND Browser Plugins must be deployed on a per-user basis. Please be sure to associate all users in your organization who need the plugin with this GPO action.
GPO-Based Configuration of Native Messaging Host Applications
Once the Native Messaging Host Applications are deployed to your endpoints, there is a final configuration required. To start a GPO-based installation of the Native Messaging Host Applications, please log on to a Windows Server Domain Controller (DC) with a domain administrator account and follow the instructions below. The Native Messaging Host Applications
Create local a batch file for each Native Messaging Host Applications you may need for use in the GPO process below. Please remember to add your own Organization UUID to each script.
Example Batch Script:
:: This batch file configures the local system for the <browser type> AND Browser Plugin Native Messaging Host ApplicationTITLE <browser_type> Native Messaging HostECHO ============================ECHO Please wait, configuring the system.ECHO ============================start “” “C:\Program Files\Hoplite\Plugins\<Browser>\<browser>-nm-host.exe” –install <uuid>Chrome Batch Script
:: This batch file configures the local system for the Chrome AND Browser Plugin Native Messaging Host ApplicationTITLE Chrome Native Messaging HostECHO ============================ECHO Please wait, configuring the system.ECHO ============================start “” “C:\Program Files\Hoplite\Plugins\Chrome\chrome-nm-host.exe” –install <uuid>Firefox Batch Script
:: This batch file configures the local system for the <browser_type> AND Browser Plugin Native Messaging Host ApplicationTITLE Firefox Native Messaging HostECHO ============================ECHO Please wait, configuring the system.ECHO ============================start “” “C:\Program Files\Hoplite\Plugins\Firefox\firefox-nm-host.exe” –install <uuid>MS Edge Batch Script
:: This batch file configures the local system for the MS Edge AND Browser Plugin Native Messaging Host ApplicationTITLE MS Edge Native Messaging HostECHO ============================ECHO Please wait, configuring the system.ECHO ============================start “” “C:\Program Files\Hoplite\Plugins\edge\edge-nm-host.exe” –install <uuid>
Next, create a new Group Policy Object in Active Directory by opening the Server Manager using the icon on the desktop taskbar or from the Start screen.
Next, in the Tools menu, select Group Policy Management.
Now, in the Group Policy Management Console (GPMC), expand your Active Directory (AD) forest, domain and click the Group Policy Objects container. Right-click the Group Policy Objects container and select New from the menu.
Next, in the New GPO dialog box, give the new Group Policy Object (GPO) a name and press OK.
Now right-click the new GPO in the right pane and select Edit from the menu.
Next, add the startup script(s) settings to the GPO in the left pane of the Group Policy Management Editor window, expand Computer Configuration, Policies and click Scripts.
In the right pane, double-click Startup.
On the Scripts tab of the Startup Properties dialog, click Show Files. Copy the file(s) you want to run to this location.
Once the script you want to run has been added to the GPO, click Add on the Scripts tab.
Click Browse in the Add a Script dialog and select the file using the file browser. Additionally in the Add a Script dialog, you can optionally specify parameters to configure how the script runs. Click OK to continue.
Note
You can add scripts and set the order in which they run by using the Up and Down buttons.
Complete the configuration by clicking OK in the Startup Properties window.
Close the Group Policy Management Editor window.
Finally, link the GPO to an OU, domain, forest or site. Back in GPMC window, decide where you want to link the new GPO. Right click the desired OU, domain, site or forest in the left pane and select Link an Existing GPO from the menu.
In the Select GPO dialog, select the GPO you just created and click OK.
The batch script will now run on computers that have the GPO applied. For more information on using the Group Policy Management Console and linking GPOs.
MSI-Based Installation & Configuration of Native Messaging Host Applications
Using a Mobile Device Management (MDM) Solution is an effective way to deploy specific browsers, policies, and extensions to hundreds or thousands of machines quickly. The following information should be incorporated into browser MDM policies referenced above to install/update browsers, and to automatically install AND Browser Plugins. We strongly recommend performing pre-deployment testing to ensure MDM-based installation methods work as intended before deploying to production systems.
Note
As there are a large number of different MDM solutions and steps to deploy the AND Browser Plugin and Native Messaging Application, these instructions may not match exactly with your solution’s workflow. Please consult your MDM provider’s documentation for MSI deployment and post-install command execution for the exact instructions for installation.
Download the MSI installer package.
Upload the MSI installer package to your MDM Solution installation policy
Next, run the appropriate Native Messaging Host Application commands as a post install command or script as follows:
C:\Program Files\Hoplite\Plugins\Chrome\chrome-nm-host.exe –install <UUID>
C:\Program Files\Hoplite\Plugins\Firefox\firefox-nm-host.exe –install <UUID>
C:\Program Files\Hoplite\Plugins\Edge\edge-nm-host.exe –install <UUID>
To validate that the MSI installation was successful, the following directories should be installed on your test machine:
C:\Program Files\Hoplite\Plugins\Chrome
C:\Program Files\Hoplite\Plugins\Firefox
C:\Program Files\Hoplite\Plugins\Edge
To validate the post-install commands were executed, run the appropriate Native Messaging Host Application as follows:
C:\Program Files\Hoplite\Plugins\Chrome\chrome-nm-host.exe
C:\Program Files\Hoplite\Plugins\Firefox\firefox-nm-host.exe
C:\Program Files\Hoplite\Plugins\Edge\edge-nm-host.exe
These commands should return the UUID and current user of the device.
Note
<UUID> is your Organization UUID issued by Hoplite Support. Example using the Chrome Native Messaging Host Application is shown below.
Warning
Each browser requires a corresponding Native Messaging Host Application to fully enable the respective AND Browser Plugins. This process will need to be repeated for each browser you intend to use.